Volkswagen ID.4: Lettering and emblems
Volkswagen ID.4 (E21) 2021-2026 Service Manual / General information - high-voltage /
Exterior equipment / Lettering and emblems
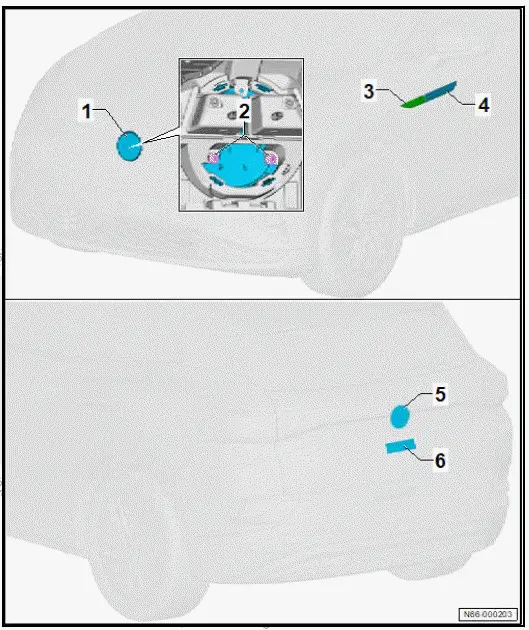
Assembly overview - lettering and badges
Overview shown for left side of vehicle as an example
- Badge at front
- Depending on equipment/
version
- ⇒ Rep. gr. 66 ; Removing
and installing
front badge
- Bolt
- Fitted on selected models
- Qty. 2
- 2 Nm
- Lettering on wing
- Fitted on selected models
- Depending on equipment/
version
- Renew after removing
- ⇒ Rep. gr. 66 ; Renewing
lettering and
badges on sides
- Lettering on door
- Fitted on selected models
- Depending on equipment/
version
- Renew after removing
- ⇒ Rep. gr. 66 ; Renewing
lettering and
badges on sides
- Badge on rear
- Renew after removing
- ⇒ Rep. gr. 66 ; Removing
and installing
badge at rear
- Lettering at rear
- Depending on equipment/version
- Renew after removing
- ⇒ Rep. gr. 66 ; Removing and installing lettering at rear
Removing and installing front badge
The front badge with contour lighting module for front badge -
MX16- will henceforth be referred as "front badge".
Removing
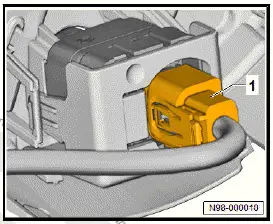
Vehicles with front overhead view camera - R243- in badge
- Disconnect electrical connector -1-.
All vehicles (continued)
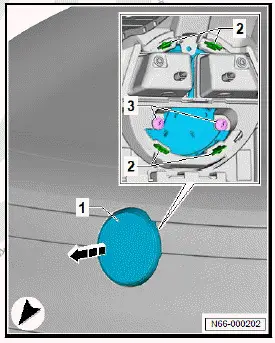
Vehicles with bolts in badge
All vehicles (continued)
- Release fasteners -2-.
- Remove front badge -1- in direction of -arrow-.
Installing
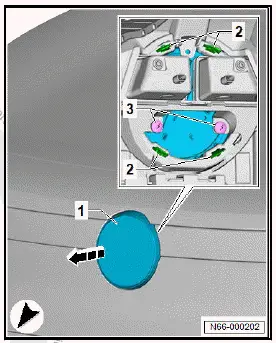
Install in reverse order of removal, observing the following:
Vehicles with front overhead view camera - R243- in badge
- Calibrate front overhead view camera - R243- ⇒ Driver
assist systems; Rep. gr. 98 ; Overhead view camera; Calibrating
overhead view camera system .
All vehicles (continued)
Tightening torques
- ⇒ Rep. gr. 66 ; Assembly overview - lettering and badges
Renewing lettering and badges on sides
Special tools and workshop equipment required
- hot air blower - V.A.G 1416-
- roller - T40400
Removal and installation are described for the left side of vehicle
as an example.
Important
Removing
- Apply heat from hot air blower - V.A.G 1416- to lettering.
- Pull off lettering.
Installing
- Remove adhesive residue, and clean bonding surfaces.
Lettering on wing
- Fit lettering at wing -1-, taking into account the specified
dimensions:
- Height dimension -a- = 11 mm
- Side dimension -b- = 0 +-1 mm
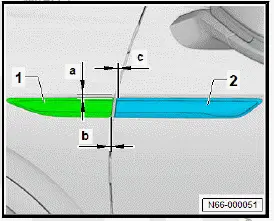
All vehicles (continued)
Lettering on front door
- Fit door lettering -2- so that it is flush with wing lettering -1-,
taking into account the specified dimensions:
- Side dimension -c- = 0 +-1 mm
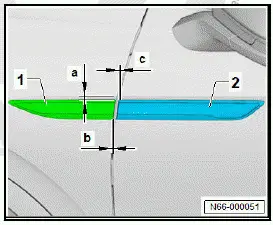
All vehicles (continued)
"GTX" lettering on front door
Left side of vehicle
- Position lettering -1- on door, observing specified dimension:
- Height dimension -a- = 26.2 +-1 mm
- Side dimension -b- = 34.7 +-1 mm
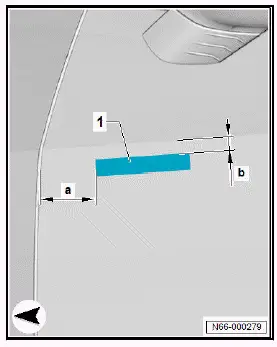
Continued GTX lettering on front door
Right side of vehicle
- Position lettering -1- on door, observing specified dimension:
- Height dimension -a- = 26.7 +-1 mm
- Side dimension -b- = 34.2 +-1 mm
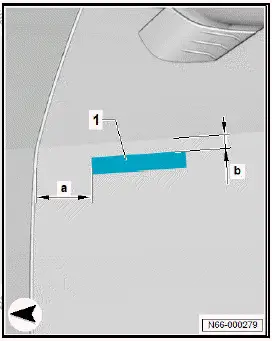
All vehicles (continued)
Lettering on charging socket flap
- Position lettering -1- on charging socket flap, observing
specified dimension:
- Height dimension -a- = 68 +-1 mm
- Side dimension -b- = 153.5 +-1 mm
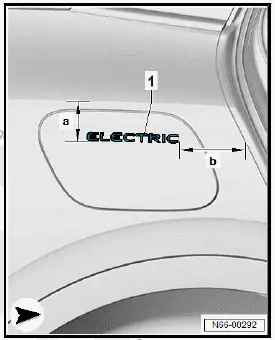
All vehicles (continued)
Lettering on side panel
- Position lettering -1- on side panel, observing specified dimension:
- Height dimension -a- = 68 +-1 mm
- Side dimension -b- = 153.5 +-1 mm
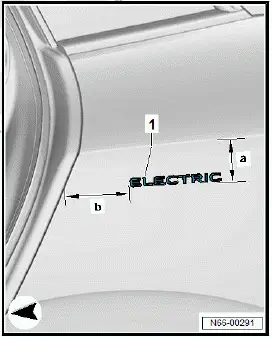
All vehicles (continued)
- Press on lettering.
- Use roller - T40400- in area of adhesive tape to press on
lettering with a force of 40 N to 50 N.
Important
- The minimum drying time must be adhered to.
Removing and installing lettering at rear
Special tools and workshop equipment required
- hot air blower - V.A.G 1416-
Important
Removing
- Apply heat from hot air blower - V.A.G 1416- to lettering.
- Pull off lettering from rear lid.
Installing
- Remove adhesive residue, and clean bonding surfaces.
Lettering beneath badge
- Fit lettering at rear -1-, taking into account the specified dimensions:
- Badge at rear -2-
- Centre line -3-
- Side dimension -a- = 53 +-1 mm
- Height dimension -b- = 68 +-1 mm
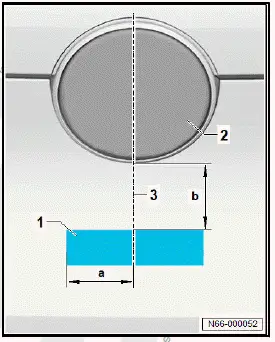
All vehicles (continued)
Rear lid lettering
- Fit lettering at rear -1-, taking into account the specified dimensions:
- Height dimension -a- = 37.5 +-1 mm
- Side dimension -b- = 28 +-1 mm
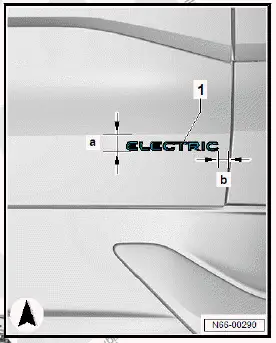
All vehicles (continued)
- Press on lettering.
- Press on lettering at rear -1- with a force of 40 N to 50 N.
Important
- The minimum drying time must be adhered to.
Removing and installing badge at rear
Special tools and workshop equipment required
- hot air blower - V.A.G 1416-
- roller - T40400-
Badge at rear is referred to hereafter as badge.
Important
Removing
NOTICE
Danger of damage to tail light cluster when dismantling
badge.
Tail light trim could crack.
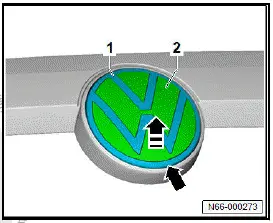
- When removing upper part of badge, do not press commercially
available plastic wedge against tail light.
- Using commercially available plastic wedge, remove upper
part of badge -1- from lower part of badge -2- until holes are
visible.
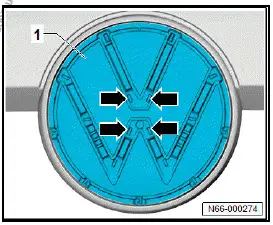
- Apply heat from hot air blower - V.A.G 1416- to lower part of
badge -1-.
- Guide commercially available hook into hole -arrows-.
- Pull off lower part of badge -1- from tail light.
Installing
Install in reverse order of removal, observing the following:
- Remove adhesive residue, and clean bonding surfaces.
- Fit badge at rear, and push it on until it can be heard to
engage.
- Roll on badge at rear in area of adhesive tape at a force of
50 N using roller - T40400- .
Important
- Observe minimum drying time of 24 hours.








 ID.4 Guide
 ID.4 Guide