

Volkswagen ID.4: Rear wheel housing
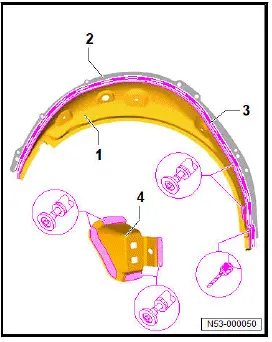
Assembly overview - rear wheel housing
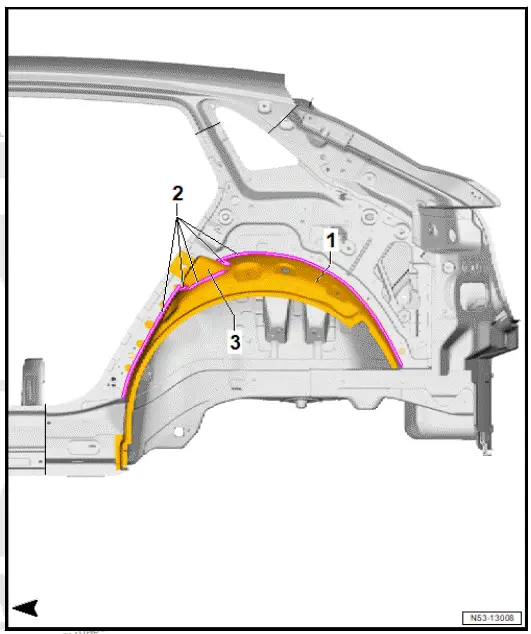
Overview shown for left side of vehicle as an example

- Outer wheel housing
- ⇒ Rep. gr. 53; Renewing
rear wheel housing
- Bonded area
- Lock reinforcement
Renewing rear wheel housing
WARNING
Gases/vapours hazardous to health are generated when
welding, soldering or cutting using tools which produce sparks
in foam-treated areas.
- Do not weld, solder or cut closer than 15 mm to moulded
foam inserts.
- Use an extraction system during work.
NOTICE
If separating cuts are made too deep, underlying reinforcement
could be damaged.
- Only make separating cuts with body saw.
- Rewelding of reinforcements is not permitted due to safety
reasons.
NOTICE
If welds are positioned too far on outside, strength could be
impaired
- RP weld points must be placed as far as possible from
outer edge of welding flange.
NOTICE
If adhesive is applied prematurely, bond could be impaired
- New part must be welded in within 90 minutes.
Observe safety information ⇒ Rep. gr. 00; Safety information
Only tools and workshop equipment authorised by Volkswagen
AG may be used ⇒ 2.1
Removal and installation are described for left side of vehicle as
an example.
Removing
Side panel removed ⇒ Rep. gr. 53; Renewing side panel, part
section.

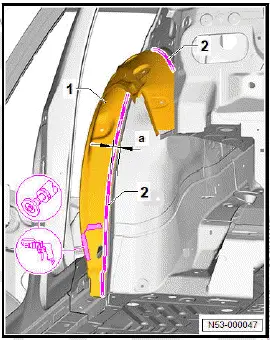
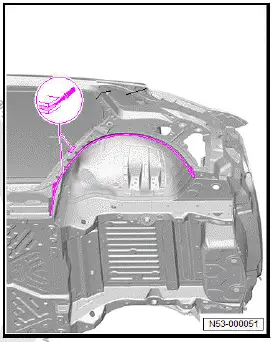
- Mark parting cut -2- all around on outer wheel housing -1-
according to dimension -a- and cut in a straight line.

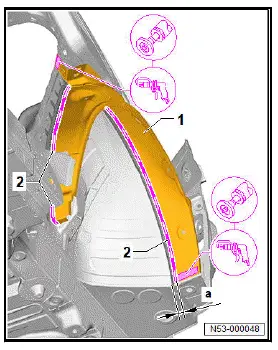
- Mark parting cut -2- all around on outer wheel housing -1-
according to dimension -a- and cut in a straight line.
- Completely remove remaining adhesive.

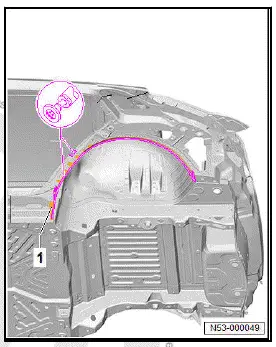
- Sand bonding surfaces and welding surfaces on remaining
material -1- down to bare metal.
- Grind bonding surfaces and welding surfaces back to bare
metal and clean.
Installing
For allocation of 2-pack body adhesive, see ⇒ Electronic
parts catalogue (ETKA)
Important
- New parts must be adapted and attached with the vehicle
standing on the straightening bracket set.
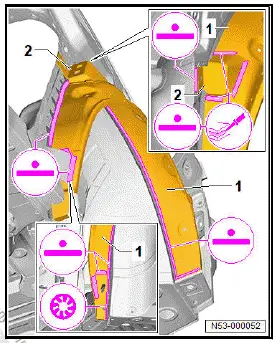
- Transfer parting cut -3- to new part -- and cut.

- Remove remaining part -2-.
- Drill 8 mm diameter holes for SG plug weld seam.
- Grind bonding surfaces and welding surfaces on new part
- -1- and -4- down to bare metal and clean.
- Apply 2-component body adhesive to entire surface.

- Adapt new part -1- to fit and fix in position.

- Check fit with add-on parts.
- Weld in new part -1-, SG plug weld seam and RP spot weld
seam.
- Apply 2-component body adhesive to entire surface.
- Adapt new part -2- to fit and fix in position.
- Check fit with add-on parts.
- Weld in new part -2-, RP spot weld seam.
- Install side panel ⇒ Rep. gr. 53; Renewing side panel, part
section.
Volkswagen ID.4 (E21) 2021-2026 Service Manual
Explore moreFeatured ID.4 Guides
Selected owner and service information from our Volkswagen ID.4 manual library.
ID.4 GuideSee how Apple CarPlay works in the Volkswagen ID.4, including smartphone integration, navigation, calls, music and key infotainment functions.
Read guide →


ID.4 GuideA practical overview of Volkswagen ID.4 instrument cluster symbols, warning lights and status indicators to help drivers understand the display quickly.
Read guide →