Volkswagen ID.4: Roof trims
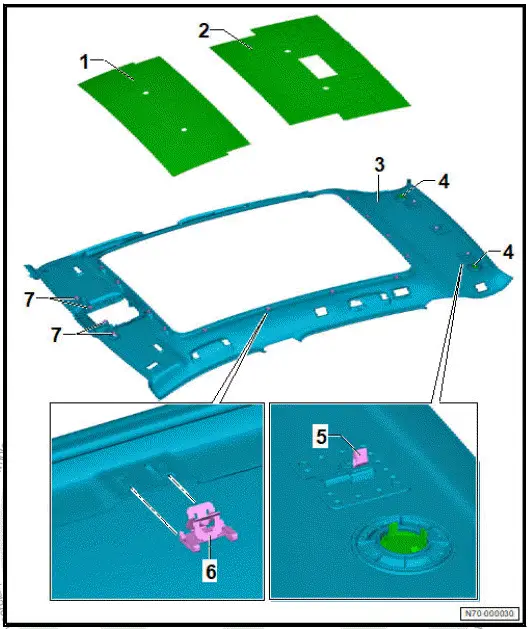
Assembly overview moulded headliner
- Roof reinforcement
- Depending on equipment
version
- ⇒ Rep. gr. 70 ; Installing
roof reinforcement
to body
- Roof reinforcement
- Depending on equipment
version
- ⇒ Rep. gr. 70 ; Installing
roof reinforcement
to body
- Moulded headliner
- Depending on equipment
version
- ⇒ Rep. gr. 70 ; Removing
and installing
moulded headliner
- Plug
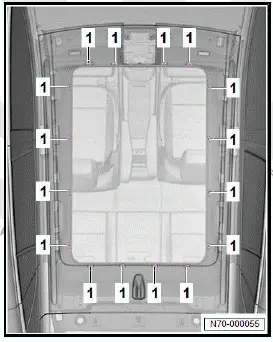
- Clip
- Clip
- Depending on equipment
version
- qty. 16
- Clip
Removing and installing moulded headliner
Special tools and workshop equipment required
Removing
Vehicles with glass panel
- Open sunroof roller blind.
All vehicles (continued)
- Release rear seat backrests, and fold them forwards.
- Move front seats to foremost and lowest position.
- When carrying out the steps below, always make sure that
the pliers - T10558A- is positioned centrally in the retaining
clips.
NOTICE
Risk of damage from incorrect handling.
- Do not kink moulded headliner.
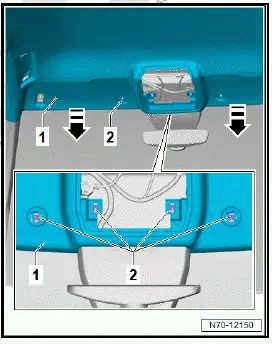
- Unclip retaining clips -2- from moulded headliner retaining
frame -1- using pliers - T10558A- .
- Hold moulded headliner -1- pretensioned in direction of
-arrow- in such a way that released retaining clips -2- do
not engage again.
Important
- The aid of an additional person is required for the subsequent
work steps.
- While holding moulded headliner -1- in position, unclip retaining
clips -2- in rear area.
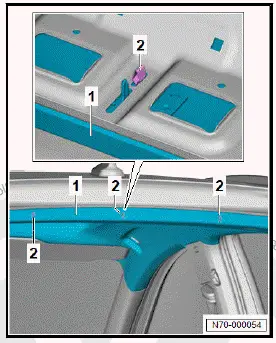
Vehicles with glass panel
- Unclip retaining clips -1- all around.
All vehicles (continued)
- Disconnect electrical connector.
Important
- The aid of an additional person is required for the subsequent
work steps.
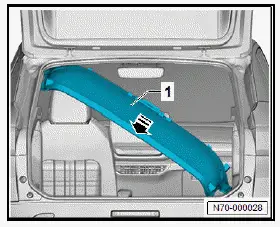
- Carefully remove moulded headliner -1- through rear lid
opening in direction of -arrow-.
Installing
Install in reverse order of removal, observing the following:
- Make sure that electrical wire is not trapped.
Installing roof reinforcement to body
Special tools and workshop equipment required
- electric cutter - V.A.G 1561A-
- hand-cartridge gun - V.A.G 1628-
- scraper - V.A.G 1561/20-
Removing
- Remove moulded headliner ⇒ Rep. gr. 70 ; Removing and
installing moulded headliner .
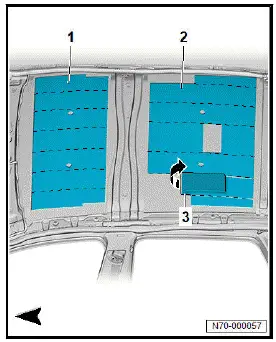
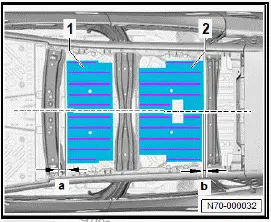
- Cut roof reinforcements -1- and -2- into approx. 6 cm wide
strips -3-.
- Pull strips -3- in direction of -arrow- off roof.
- Remove adhesive residue using electric cutter - V.A.G
1561A- and scraper - V.A.G 1561/20- .
- If the paintwork structure is damaged when the roof reinforcements
are removed, repair paintwork damage according
to the ⇒ Paintwork structure specifications.
- On vehicles with 2 bitumen mats behind the roof reinforcement
-2-, the mats must be completely removed before installing
the new roof reinforcement.
Installing
Important
- Observe processing instructions for the adhesive when installing
roof reinforcements.
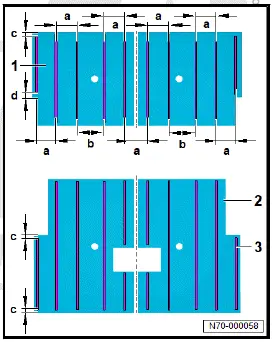
- Using hand-cartridge gun - V.A.G 1628- , apply 1-component
assembly adhesive ⇒ Electronic parts catalogue (ETKA)
in beads -3- of 6 mm in diameter to roof reinforcements
-1- and -2- in accordance with the following dimensions:
- Dimension -a- = 95 mm
- Dimension -b- = 105 mm
- Dimension -c- = 20 mm
- Dimension -d- = 21 mm
- Position front roof reinforcement -1- according to dimension
-a- centrally on roof, and press it on across entire surface.
- Dimension -a- = 56 +- 3 mm from rear sheet-metal edge.
- Position rear roof reinforcement -2- according to dimension
-b- centrally on roof; and press it on across entire surface.
- Dimension -b-: 24 +- 3 mm from front sheet-metal edge.
- Install moulded headliner ⇒ Rep. gr. 70 ; Removing and
installing moulded headliner .

Volkswagen ID.4 (E21) 2021-2026 Service Manual
Roof trims
Explore moreFeatured ID.4 Guides
Selected owner and service information from our Volkswagen ID.4 manual library.
 ID.4 Guide
Service information for the Volkswagen ID.4 rear cross member, including component location, attachment points and repair-oriented removal and installation guidance.
Read guide → ID.4 Guide
Practical Volkswagen ID.4 service procedures for joining and separating components, connectors and assemblies correctly and without unnecessary damage.
Read guide →