Volkswagen ID.4: Windscreen
Volkswagen ID.4 (E21) 2021-2026 Service Manual / General information - high-voltage /
Glazing / Windscreen
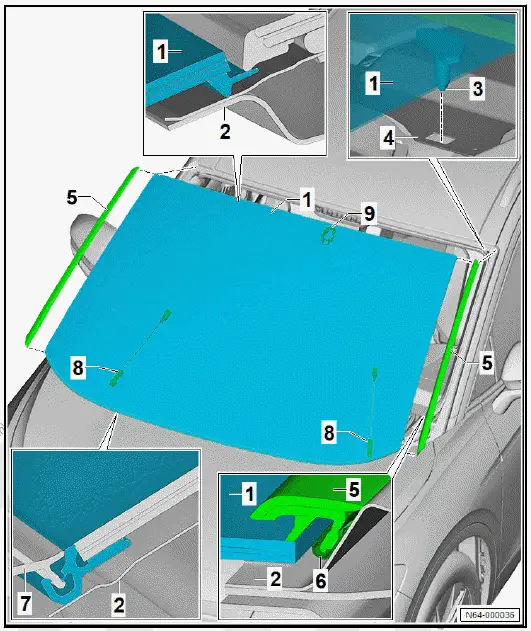
Assembly overview - windscreen
- Windscreen
- Depending on equipment/
version
- ⇒ Rep. gr. 64 ; Removing
and installing
windscreen
- ⇒ General information
- body; Rep.
gr. 52 ; General
notes - windows; Removing
broken window
- Body flange
- ⇒ General information
- body; Rep.
gr. 52 ; Use of adhesives;
Preparing body
flange for installation
- Centring pin
- Position depends on
model
- Depending on equipment/
version
- Qty. 2
- Mounting for centring pin
- Position depends on
model
- Water deflector
- ⇒ Rep. gr. 66 ; Removing
and installing
water deflector strip
- Retaining strip
- ⇒ Rep. gr. 66 ; Removing
and installing
retaining strip
- Plenum chamber cover
- ⇒ Rep. gr. 50 ; Removing and installing plenum chamber cover
- Disconnect electrical connector for heated windscreen - Z2-
- Depending on model
- Depending on equipment/version
- Retaining plate for interior mirror
- ⇒ General body repairs, interior; Rep. gr. 68 ; Interior mirror; Bonding
retaining plate for interior mirror
Removing and installing windscreen
Special tools and workshop equipment required
- cutting cord - VAS 861 001/1A-
- cutting tool for bonded windows - VAS 6452-
- removal tool for flush bonded windows - V.A.G 1474B-
- setting gauge - 3371-
- window removal set - VAS 861 001A
Removal
of the windscreen is described using window removal
set - VAS 861 001A- .
It is also possible to use removal tool for flush bonded windows
- V.A.G 1474B- or cutting tool for bonded windows - VAS
6452- .
Removing
- Remove A-pillar upper trims on left and right ⇒ General
body repairs, interior; Rep. gr. 70 ; Trims, interior; Removing
and installing A-pillar trim .
- Remove left and right sun visors ⇒ General body repairs,
interior; Rep. gr. 68 ; Equipment; Removing and installing
sun visor .
- Remove interior mirror ⇒ General body repairs, interior;
Rep. gr. 68 ; Interior mirror; Removing and installing interior
mirror .
Vehicles with rain and light sensor - G397- :
- Remove rain and light sensor - G397- ⇒ Electrical system;
Rep. gr. 92 ; Windscreen wiper system; Removing and installing
rain and light sensor G397
All vehicles (continued)
For vehicles with front camera for driver assist systems -
R242- .
- Remove front camera for driver assist systems - R242-
⇒ Driver assist systems; Rep. gr. 98 ; Senders/sensors/
control units; Removing and installing front camera for
driver assist systems R242 .
All vehicles (continued)
NOTICE
Risk of damage from incorrect handling.
- Do not kink moulded headliner.
- Lower moulded headliner in area of windscreen far enough
to allow windscreen to be cut out without causing damage
to moulded headliner ⇒ General body repairs, interior; Rep.
gr. 70 ; Roof trims; Removing and installing moulded headliner
.
- Remove plenum chamber cover ⇒ Rep. gr. 50 ; Removing
and installing plenum chamber cover .
- Remove water deflector strip on left and right ⇒ Rep.
gr. 66 ; Trims/extensions/cladding; Removing and installing
water deflector strip .
Vehicles with heated windscreen - Z2-
- Disconnect electrical connector for heated windscreen - Z2- .
- Remove front roof module - WX3- ⇒ Electrical system; Rep.
gr. 96 ; Controls; Removing and installing front roof module
[WX3] .
- Unbolt earth cable for heated windscreen - Z2- .
All vehicles (continued)
- In vehicle interior, insert cutting guard from windscreen removal
set between cutting cord and dash panel.
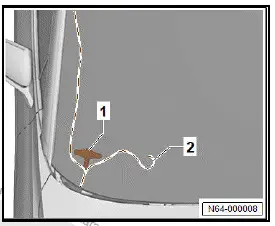
- Insert cutting cord - VAS 861 001/1A- -2- in awl -1- from
windscreen removal set.
CAUTION
Risk of injury to hands and eyes due to glass splinters.
Danger of cutting yourself.
- Put on safety goggles.
- Put on protective gloves.
NOTICE
Risk of damage to surfaces of components.
- Mask off surrounding components in the visible area with
commercially available adhesive tape.
- Cover exit area of awl -1- on body flange with adhesive tape.
- In this area, pierce awl -1- from inside towards outside
through adhesive bead, and pull through cutting cord -2-
towards outside.
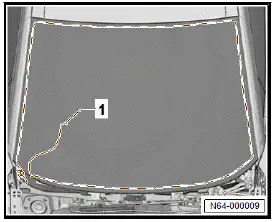
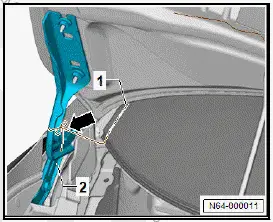
- Lay cutting cord -1- all around beneath windscreen.
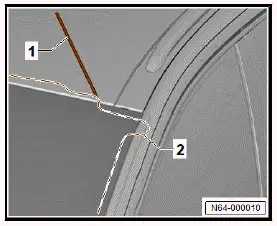
- When inserting cutting cord -2- between roof and windscreen,
use threading aid -1-.
- Secure outer end of cutting cord -1- to right hinge -2-
-arrow-.
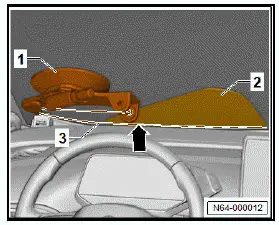
- Secure cutting device -1- from windscreen removal set at
lower left inner side of window.
- Insert cutting cord -3- into cutting out device -1- -arrow-.
- Tension cutting cord -3- with cutting out device -1-.
- Insert cutting guard -2- between cutting cord -3- and dash
panel cover.
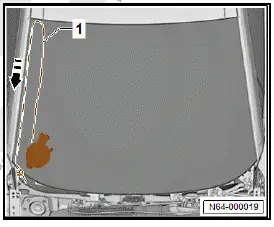
- Cut out windscreen in lower area using cutting cord -1-.
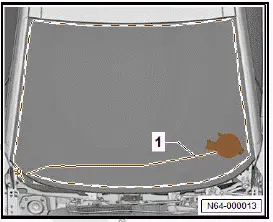
Move cutting device -1- to upper left corner of windscreen.
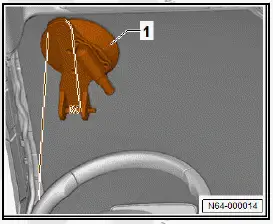
- Cut out windscreen in direction of -arrow- in area of left
A-pillar using cutting cord -1-.
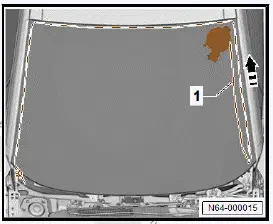
- Move cutting device -2- to upper right corner of windscreen.
- Insert cutting guard -1- between cutting cord -3- and moulded
headliner.
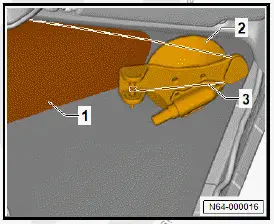
- Cut out windscreen in upper area using cutting cord -1-.
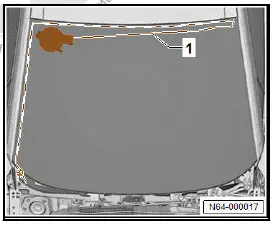
- Move cutting device -1- to lower right corner of windscreen.
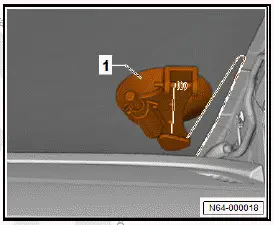
- Cut out windscreen in direction of -arrow- in area of right
A-pillar using cutting cord -1-.
Important
- The aid of an additional person is required for the subsequent
work steps.
- Use 2 commercially available suction lifters to lift windscreen
out of vehicle.
Installing
Old undamaged windscreen
- ⇒ General information - body; Rep. gr. 52 ; Using adhesives;
Preparing undamaged windows for installation .
All vehicles (continued)
New windscreen
- ⇒ General information - body; Rep. gr. 52 ; Using adhesives;
Preparing new windows for installation .
All vehicles (continued)
- ⇒ General information - body; Rep. gr. 52 ; Using adhesives;
Preparing body flange for installation .
- Observe ⇒ General information - body; Rep. gr. 52 ; Using
adhesives; Notes on installing bonded windows .
- Observe ⇒ General information - body; Rep. gr. 52 ; Using
adhesives; Minimum drying times for bonded windows .
- Apply window adhesive all around windscreen ⇒ General
information - body; Rep. gr. 52 ; Using adhesives; Notes on
installing bonded windows .
Dimensions for cross-section of adhesive bead:
- Height = 10 mm +-1 mm
- Width = 6.5 mm +-0.5 mm
Further installation is carried out in reverse order of removal.
Observe the following when doing this:
- Check gaps with setting gauge - 3371- , observing ⇒ Rep.
gr. 00 ; front gaps while doing so.

Volkswagen ID.4 (E21) 2021-2026 Service Manual
Windscreen
Explore moreFeatured ID.4 Guides
Selected owner and service information from our Volkswagen ID.4 manual library.
 ID.4 Guide
Volkswagen ID.4 plastic repair procedures covering surface preparation, filler work, sanding and restoration of damaged plastic exterior components.
Read guide → ID.4 Guide
How to switch the Volkswagen ID.4 ignition on and off correctly, including the basic operating conditions and what the driver should expect from the vehicle.
Read guide →