Volkswagen ID.4: Rear windscreen
Volkswagen ID.4 (E21) 2021-2026 Service Manual / General information - high-voltage /
Glazing / Rear windscreen
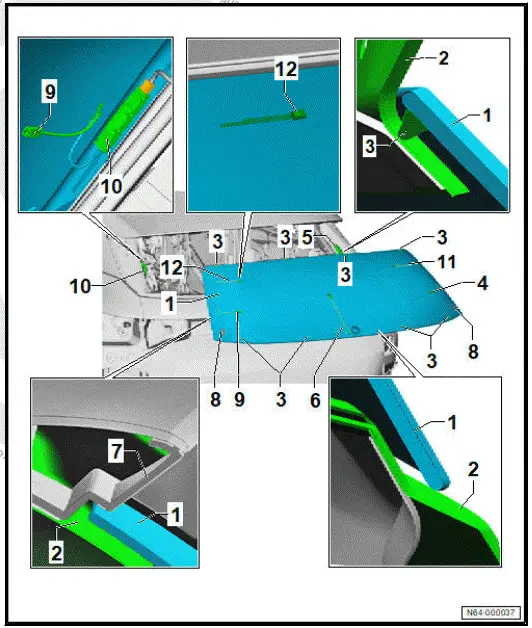
Assembly overview - rear window
- Rear window - ZX1-
- With heated rear window
- Z1-
- With glass breakage
sensor for rear window
- G304- depending on
model
- ⇒ Rep. gr. 64 ; Removing
and installing
rear window
- ⇒ General information
- body; Rep.gr. 52 ; General
notes - windows; Removing
broken window
- Body flange
- Spacer
- Electrical connector for
heated rear window - Z1-
- Frequency modulation
(FM) frequency filter in negative
wire - R178-
- Electrical connector for
glass breakage sensor for
rear window - G304-
- Depending on model
- Depending on equipment/
installation version
- Side spoiler
- Depending on model
- ⇒ ; Rep. gr. 66 ; Spoiler; Removing and installing side spoiler
- Centring pin
- Depending on equipment/installation version
- Qty. 2
- Electrical connector for heated rear window - Z1-
- Frequency modulation (FM) frequency filter in positive wire - R179-
- Electrical connector for window aerial
- Electrical connector for window aerial
Removing and installing rear window
Special tools and workshop equipment required
- awl - V.A.G 1474/2-
- cutting cord - VAS 861 001/1A-
- plastic strip - V.A.G 1474/15-
- pull handle - V.A.G 1351/1-
- reel device - V.A.G 1654 A-
- removal kit for flush bonded windows - V.A.G 1474B-
- removal kit for flush bonded windows - VAS 6452-
- setting gauge - 3371-
- wedge - V.A.G 1474/5-
- windscreen removal set - VAS 861 001A
Removing
The description for the removal of the rear window is based on
the removal kit for flush bonded windows - V.A.G 1474B- .
Alternatively, removal kit for flush bonded windows - VAS 6452-
or windscreen removal set - VAS 861 001A- can also be used.
Important
- When reusing the rear window - ZX1- , make sure not to
damage the electrical connectors for the heated rear window
- Z1- , the window aerials and the glass breakage sensor for
rear window - G304- .
- Disconnect electrical connectors for heated rear window -
Z1- , window aerials and glass breakage sensor for rear window
- G304- .
CAUTION
Risk of injury to hands and eyes due to glass splinters.
Danger of cutting yourself.
- Put on safety goggles.
- Put on protective gloves.
NOTICE
Risk of damage to surfaces of components.
- Mask off surrounding components in the visible area with
commercially available adhesive tape.
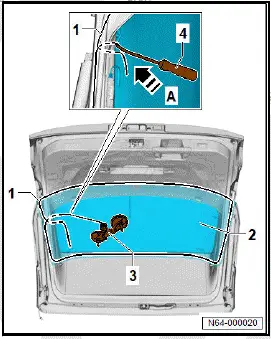
- Pull cutting cord - VAS 861 001/1A- -1- with awl -
V.A.G 1474/2- -4- at marked position -arrow A- towards inside
through adhesive sealant.
- Secure end of cutting cord with pull handle - V.A.G 1351/1-
to prevent it from being pulled out.
- Place cutting cord around rear window -2- and guide 2nd
end of cutting cord inwards.
- Secure end of cutting cord to reel device - V.A.G 1654 A-
-3-.
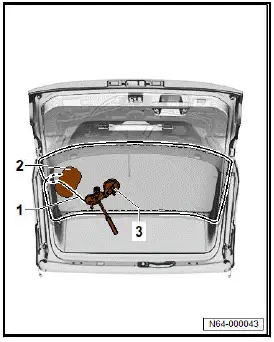
- Push in plastic strip - V.A.G 1474/15- between rear window
and body flange.
- Fit reel device -3- in position shown, and cut free rear window
in upper area towards both sides.
- Reposition reel device -3- and cut free rear window in lower
area.
- Use wedge - V.A.G 1474/5- -2- to press cutting cord -1-
against rear window while cutting it free to ensure sufficient
clearance to body flange.
Important
- The aid of an additional person is required for the subsequent
work steps.
- Use 2 suction lifters to remove rear window.
Installing
Install in reverse order of removal, observing the following:
Undamaged windscreen
- ⇒ General information - body; Rep. gr. 52 ; Use of adhesives;
Preparing undamaged windows for installation .
All vehicles (continued)
New windscreen
- ⇒ General information - body; Rep. gr. 52 ; Use of adhesives;
Preparing new windows for installation .
All vehicles (continued)
- ⇒ General information - body; Rep. gr. 52 ; Use of adhesives;
Preparing body flange for installation .
- ⇒ General information - body; Rep. gr. 52 ; Use of adhesives;
Installation instructions for bonded windows .
- ⇒ General information - body; Rep. gr. 52 ; Use of adhesives;
Minimum drying times for bonded windows .
- Apply window adhesive all around to rear window ⇒ General
information - body; Rep. gr. 52 ; Use of adhesives;
Installation instructions for bonded windows; Materials for
bonded windows .
Dimensions for cross-section of adhesive bead:
- Height = 10 mm +-1 mm
- Width = 6.5 mm +-0.5 mm
Spoiler design depends on model.
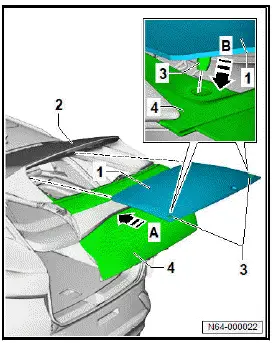
- Guide rear window -1- at a distance to body flange in direction
of -arrow A- under spoiler -2-.
- Place rear window -1- with centring pins -3- in direction of
-arrow B- on rear lid -4-.
Important
- If the rear window has no centring pins, it must be secured
against slipping.
- Check gaps with setting gauge - 3371- , observing ⇒ Rep.gr. 00 ; rear gaps while doing so.

Volkswagen ID.4 (E21) 2021-2026 Service Manual
Rear windscreen
Explore moreFeatured ID.4 Guides
Selected owner and service information from our Volkswagen ID.4 manual library.
 ID.4 Guide
See how Apple CarPlay works in the Volkswagen ID.4, including smartphone integration, navigation, calls, music and key infotainment functions.
Read guide → ID.4 Guide
Service information for the Volkswagen ID.4 rear cross member, including component location, attachment points and repair-oriented removal and installation guidance.
Read guide →