Volkswagen ID.4: Rear seat covers and padding
Assembly overview - rear bench seat cover and padding
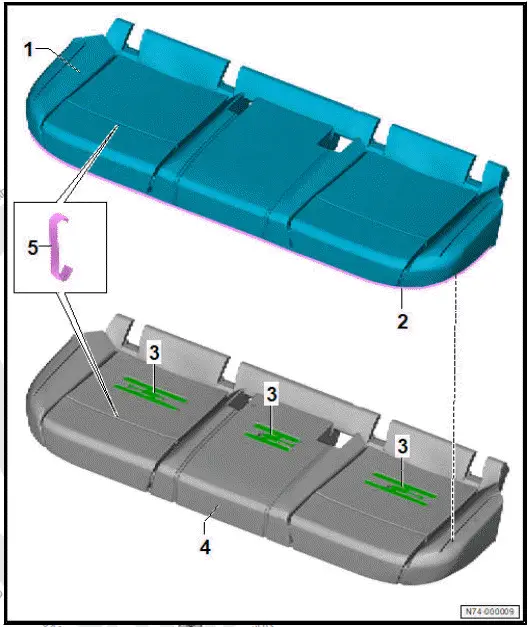
- Seat cover
- Depending on equipment/
version
- ⇒ Rep. gr. 74 ; Removing
and installing
cover and padding of
rear bench seat
- ⇒ Rep. gr. 74 ; Separating
rear bench seat
cover from padding
- Piping strip
- Seat occupied sensor
- Rear seat occupied
sensor on driver side -
G177-
- Rear seat occupied
sensor, centre - G1010-
- Rear seat occupied
sensor on passenger
side - G178-
- ⇒ Rep. gr. 69 ;
Removing and installing
rear seat occupied
sensor [G177/
G178/G1010]
- Seat padding
- Depending on equipment/
version
- ⇒ Rep. gr. 74 ; Removing
and installing
cover and padding of
rear bench seat
- ⇒ Rep. gr. 74 ; Separating
rear bench seat
cover from padding
- Upholstery clip
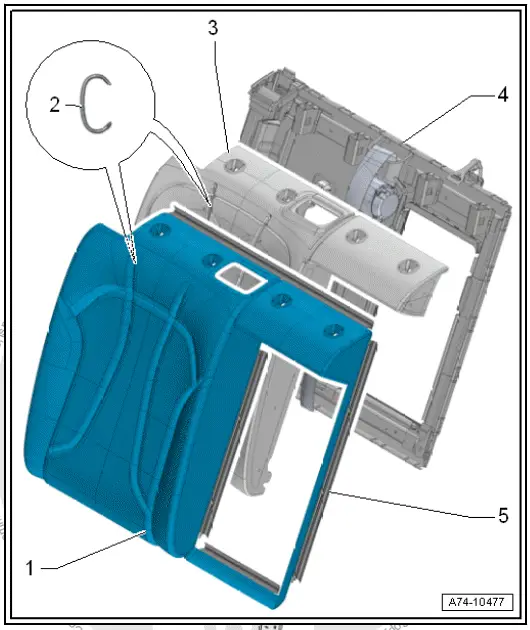
Assembly overview - rear seat backrest cover and padding
The overview is shown for the rear seat backrest (2/3) as an
example.
- Backrest cover
- Depending on equipment/
version
- ⇒ Rep. gr. 74 ; Removing
and installing
cover and padding of
rear seat backrest
- ⇒ Rep. gr. 74 ; Separating
rear seat backrest
cover from padding
- Upholstery clip
- Backrest padding
- Depending on equipment/
version
- ⇒ Rep. gr. 74 ; Removing
and installing
cover and padding of
rear seat backrest
- ⇒ Rep. gr. 74 ; Separating
rear seat backrest
cover from padding
- Backrest frame
- Beading strip
Removing and installing cover and padding of rear bench seat
Special tools and workshop equipment required
Removing
- Remove bench seat ⇒ Rep. gr. 72 ; Removing and installing
bench seat/individual seats .
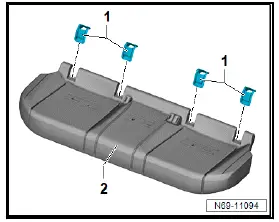
- Unclip child seat anchor guide of rear bench seat -1- upwards
from rear bench seat -2-.
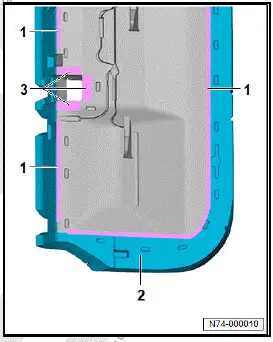
- Open securing channel and Velcro fastener -3-.
- Using hook - 3370- , open beading strips -1-.
- Remove cover -2- together with padding.
Installing
Install in reverse sequence of removal.
Removing and installing cover and padding of rear seat backrest
Removing
- Remove rear seat backrest ⇒ Rep. gr. 72 ; Removing and
installing rear seat backrest .
- Remove head restraint ⇒ Rep. gr. 72 ; Removing and installing
head restraint .
- Remove head restraint guides ⇒ Rep. gr. 72 ; Removing
and installing head restraint guide .
- Remove locking mechanism trim ⇒ Rep. gr. 72 ; Removing
and installing locking mechanism trim .
- Using commercially available plastic wedge, release clip -2-
from cover -1- in area of inner pivot pin.
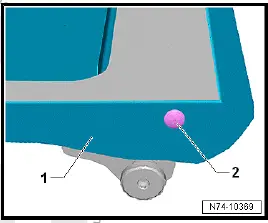
Rear left seat backrest (1/3)
- Starting at locking mechanism, lever beading strip -1- in direction
of -arrow- all around off backrest frame -3-.
- Remove cover -2- together with padding.
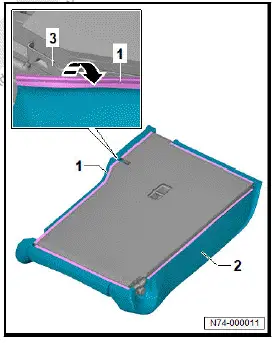
All vehicles (continued)
Rear seat backrest (2/3) without load-through hatch
- Remove rear belt guide ⇒ Rep. gr. 69 ; Removing and
installing rear belt guide .
- Starting at locking mechanism, lever beading strip -1- in direction
of -arrow- all around off backrest frame -3-.
- Remove cover -2- together with padding.
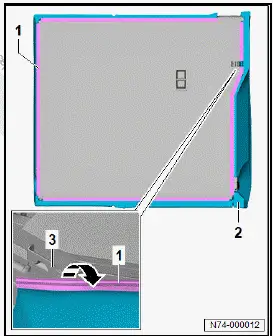
All vehicles (continued)
Rear seat backrest (2/3) with load-through hatch
- Remove rear belt guide ⇒ Rep. gr. 69 ; Removing and
installing rear belt guide .
- Remove flap for load-through hatch ⇒ Rep. gr. 72 ; Removing
and installing flap for load-through hatch .
- Remove trim frame for load-through hatch ⇒ Rep. gr. 72 ;
Removing and installing trim frame for load-through hatch .
- Starting at locking mechanism, lever beading strip -1- in direction
of -arrow- all around off backrest frame -4-.
- Lever beading strip -2- all around off load-through hatch.
- Remove cover -3- together with padding.
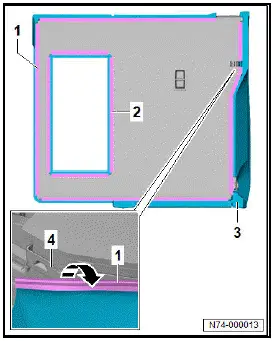
All vehicles (continued)
Installing
Install in reverse sequence of removal.
Removing and installing intermediate padding, backrest with load-through
hatch
Removing
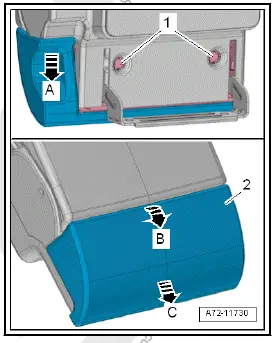
- Fold down flap for load-through hatch.
- Release fasteners -1- using a commercially available screwdriver
while at the same time pushing intermediate padding
-2- as far as stop in direction of -arrow A-.
- Slightly raise intermediate padding in direction of -arrow B-,
and detach it in direction of -arrow C-.
Installing
Install in reverse sequence of removal.
Separating rear bench seat cover from padding
Special tools and workshop equipment required
- upholstery clip pliers - V.A.G 1634B
Removing
- Remove cover and padding of rear bench seat ⇒ Rep.
gr. 74 ; Removing and installing cover and padding of rear
bench seat .
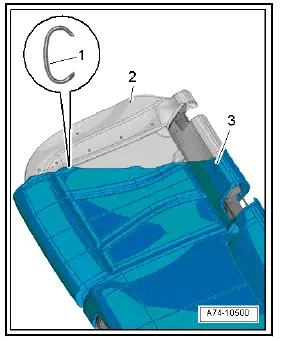
- Pull cover -3- as far as possible off padding -2-.
- Using commercially available pliers, open upholstery clips
-1-.
- Separate cover -3- from padding -2-.
Installing
Install in reverse order of removal, observing the following:
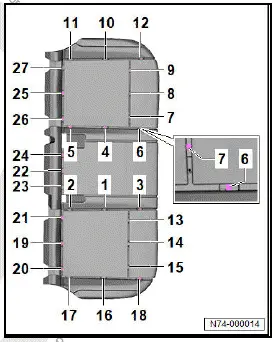
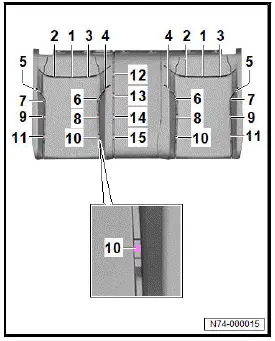
- Secure upholstery clips in sequence -1- through -27- using
upholstery clip pliers - V.A.G 1634B- .
- Make sure that the cover is fitted without creases.
Separating rear seat backrest cover from padding
Special tools and workshop equipment required
- upholstery clip pliers - V.A.G 1634BID
Removing
- Remove cover and padding of rear seat backrest ⇒ Rep.
gr. 74 ; Removing and installing cover and padding of rear
seat backrest .
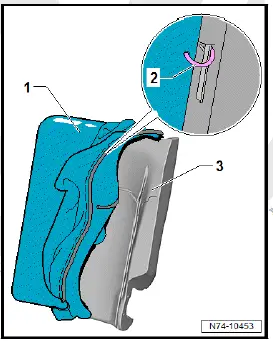
- Pull cover -1- off padding -3-.
- Using commercially available pliers, open upholstery clips
-2-.
- Remove cover -1- from padding -3-.
Installing
Install in reverse order of removal, observing the following:
- Secure upholstery clips in sequence -1- through -11- using
upholstery clip pliers - V.A.G 1634B- .
- Rear seat backrest without load-through hatch: secure upholstery
clips -12- through -15-.
- Make sure that the cover is fitted without creases.

Volkswagen ID.4 (E21) 2021-2026 Service Manual
Rear seat covers and padding
Explore moreFeatured ID.4 Guides
Selected owner and service information from our Volkswagen ID.4 manual library.
 ID.4 Guide
How to switch the Volkswagen ID.4 ignition on and off correctly, including the basic operating conditions and what the driver should expect from the vehicle.
Read guide → ID.4 Guide
Volkswagen ID.4 plastic repair procedures covering surface preparation, filler work, sanding and restoration of damaged plastic exterior components.
Read guide →