


English German French Spanish
Volkswagen ID.4 Owners & Service Manuals

Volkswagen ID.4: Voltage converter

Volkswagen ID.4 (E21) 2021-2026 Service Manual / Electric drive EIP220, EIA200, EIA210 / Electric drive systems / Voltage converter

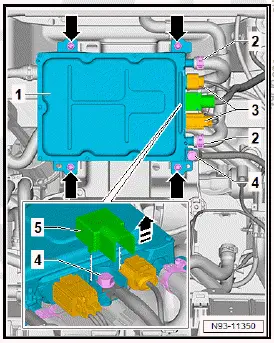
Assembly overview - voltage converter, rear-wheel drive

Assembly overview - voltage converter
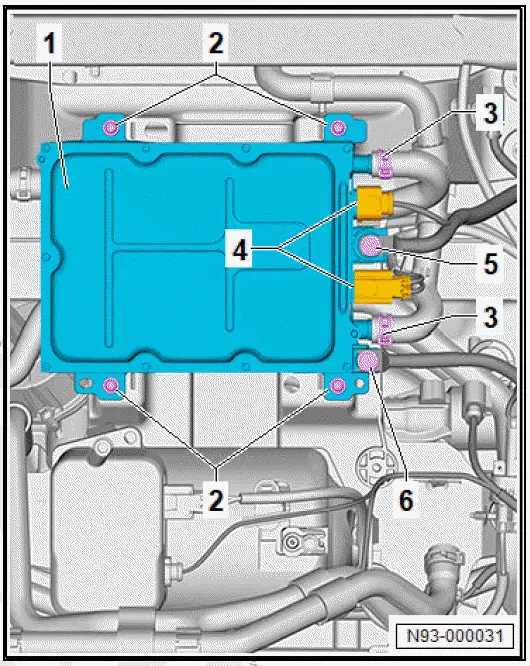
Volkswagen ID.4. Assembly overview - voltage converter, rear-wheel drive

  1. Voltage converter - A19-
  • ⇒ Rep. gr. 93 ; Removing and installing voltage converter [A19]
  1.  Bolt
  • Tightening sequence: "diagonal sequence"
  • Qty. 4
  • M6×25
  • 8 Nm
  1. Coolant connections
  2. High-voltage electrical connectors
  3. 12 V voltage supply
  • Positive terminal
  • 20 Nm
  1. 12 V voltage supply
  • Negative terminal
  • 20 Nm

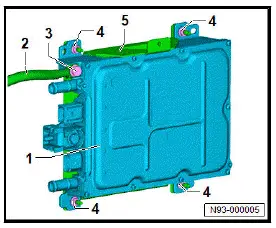
Assembly overview - voltage converter, all-wheel drive

Assembly overview - voltage converter
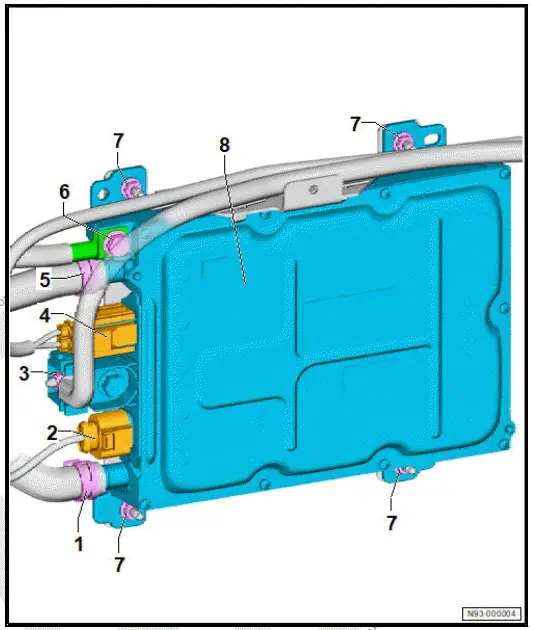
Volkswagen ID.4. Assembly overview - voltage converter, all-wheel drive

  1. Coolant connection
  2. Electrical connector for electrical system
  3. 12 V voltage supply
  • Positive terminal
  • 8 Nm
  1. High-voltage electrical connector
  2. Coolant connection
  3. 12 V voltage supply
  • Negative terminal
  • 20 Nm
  1. Nut
  • Qty. 4
  • 8 Nm
  1. Voltage converter - A19-
  • ⇒ Rep. gr. 93 ; Removing and installing voltage converter [A19]

Removing and installing voltage converter, rear-wheel drive

Removing and installing voltage converter

Special tools and workshop equipment required

  • drip tray for workshop hoist - VAS 6208-
  • hose clamps, up to Ø 25mm - 3094-

Voltage converter - A19- is referred to hereafter as voltage converter.

Removing

DANGER

High voltage can cause fatal injury.

Danger of severe or fatal injuries from electric shock or electric arcs.

  • Have a high-voltage technician (HVT) or a high-voltage expert (HVE) de-energise the high-voltage system.

⇒ Rep. gr. 93 ; De-energise high-voltage system .

If the voltage converter is to be renewed, perform the test plan for renewal of the control unit:

  • Carry out function "Renew control unit" using ⇒ Vehicle diagnostic tester ⇒ Rep. gr. 00 ; Access to diagnoses .

Continued

  •  Remove air intake unit of heater and air conditioning unit ⇒ Heating, air conditioning; Rep. gr. 87 ; Front heater and air conditioning unit; Removing and installing air intake box of heater and air conditioning unit .
  • Disconnect battery ⇒ Electrical system; Rep. gr. 27 ; Battery; Disconnecting and connecting battery .
  • Place drip tray for workshop hoist - VAS 6208- under front of vehicle.
  • Clamp off coolant hoses using hose clamps, up to Ø 25mm - 3094- .
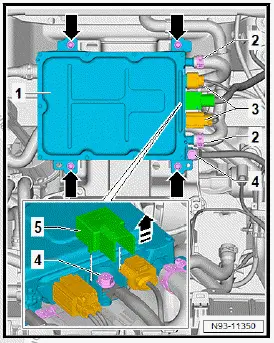
  • Detach clamps -2-, and pull off coolant hoses.

Volkswagen ID.4. Removing and installing voltage converter, rear-wheel drive

  • Disconnect high-voltage electrical connector -3- from voltage converter.
  • Fold up positive cable cap -5-.
  • Unscrew bolts -4-.
  • Unscrew bolts -arrows-.

Volkswagen ID.4. Removing and installing voltage converter, rear-wheel drive

Installing

Install in reverse order of removal, observing the following:

  • ⇒ Rep. gr. 19 ; Cooling system/coolant; Filling cooling system

If the voltage converter has been renewed, perform the test plan for renewal of the control unit:

  • Carry out function "Renew control unit" using ⇒ Vehicle diagnostic tester ⇒ Rep. gr. 00 ; Access to diagnoses .

Continued

WARNING

High voltage can cause fatal injury.

Danger of severe or fatal injuries from electric shock or electric arcs.

  • Have a high-voltage technician (HVT) or a high-voltage expert (HVE) re-energise the high-voltage system.
  • ⇒ Rep. gr. 93 ; Re-energise high-voltage system .

Tightening torques

  • ⇒ Rep. gr. 93 ; Assembly overview - voltage converter

Removing and installing voltage converter, all-wheel drive

Removing and installing voltage converter

The voltage converter - A19- will henceforth be referred to as "voltage converter".

The charging unit 1 for high-voltage battery - AX4- will henceforth be referred to as "charging unit".

Removing

DANGER

High voltage can cause fatal injury.

Danger of severe or fatal injuries from electric shock or electric arcs.

  • Have a high-voltage technician (HVT) or a high-voltage expert (HVE) de-energise the high-voltage system.

⇒ Rep. gr. 93 ; De-energise high-voltage system

If the voltage converter is to be renewed, perform the test plan for renewal of the control unit:

  • Carry out function "Renew control unit" using ⇒ Vehicle diagnostic tester ⇒ Rep. gr. 00 ; Access to diagnoses .

Continued

  •  Disconnect battery ⇒ Electrical system; Rep. gr. 27 ; Battery; Disconnecting and connecting battery .
  • Remove charging unit ⇒ Rep. gr. 93 ; Removing and installing charging unit 1 for high-voltage battery [AX4] .
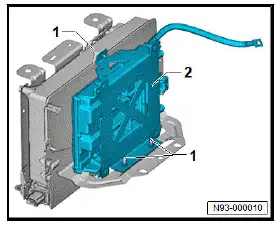
  • Unscrew bolts -1-.
  • Detach voltage converter with bracket -2- from charging unit.

Volkswagen ID.4. Removing and installing voltage converter, all-wheel drive

  • Unscrew bolt -3-.
  • Unscrew nuts -4-.
  • Detach bracket -5- from voltage converter -1-.

Volkswagen ID.4. Removing and installing voltage converter, all-wheel drive

Installing

Install in reverse order of removal, observing the following:

If the voltage converter has been renewed, perform the test plan for renewal of the control unit:

  • Carry out function "Renew control unit" using ⇒ Vehicle diagnostic tester ⇒ Rep. gr. 00 ; Access to diagnoses .

Continued

WARNING

High voltage can cause fatal injury.

Danger of severe or fatal injuries from electric shock or electric arcs.

  • Have a high-voltage technician (HVT) or a high-voltage expert (HVE) re-energise the high-voltage system.

⇒ Rep. gr. 93 ; Re-energise high-voltage system .

Tightening torques

  • ⇒ Rep. gr. 93 ; Assembly overview - voltage converter

Volkswagen ID.4 (E21) 2021-2026  Service Manual

Volkswagen ID.4 (E21) 2021-2026 Service Manual

Voltage converter

Explore more

Featured ID.4 Guides

Selected owner and service information from our Volkswagen ID.4 manual library.
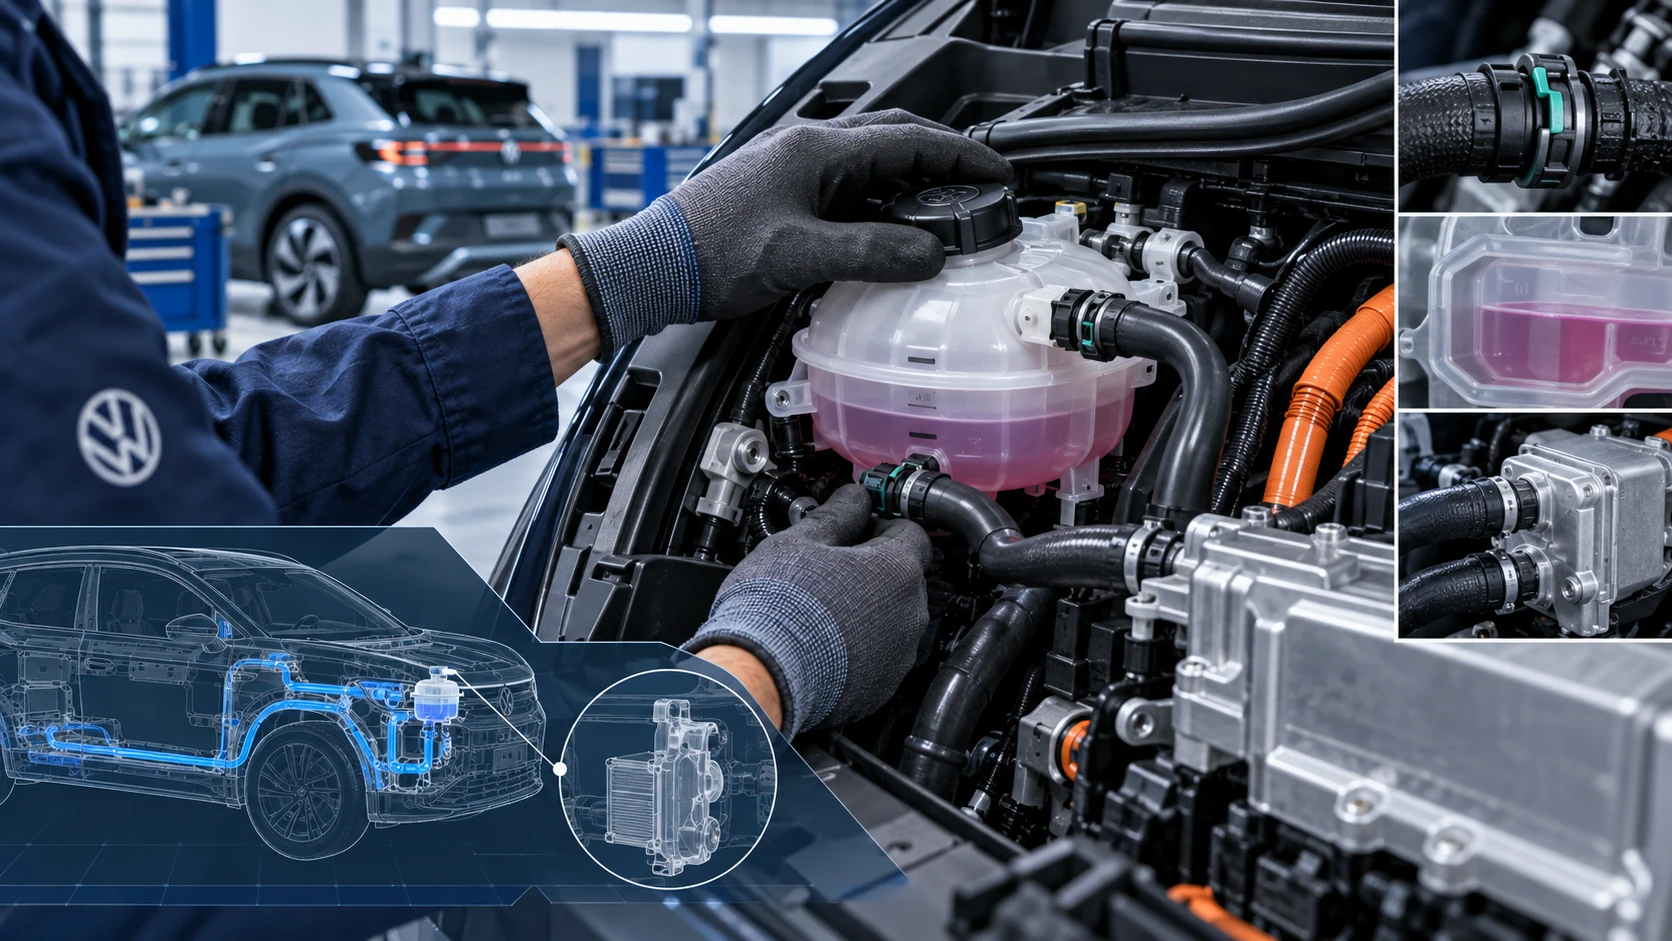
Rear Cross MemberID.4 Guide

Rear Cross Member

Service information for the Volkswagen ID.4 rear cross member, including component location, attachment points and repair-oriented removal and installation guidance.

Read guide